There’s just something about Luby’s Fried Fish that hits different, especially if you grew up going through that cafeteria line and loading up a plate with crispy fish and a big scoop of tartar sauce.

I’ve tested a few versions at home, and the one I’m sharing today is the closest I’ve made so far crunchy cracker coating, tender flaky cod, and that creamy tartar sauce that makes you want to dip everything literally.
Before we jump in, here’s a quick recipe overview.
- Cuisine: American / Southern Cafeteria-Style
- Prep Time: 15 minutes
- Cook Time: 12 minutes
- Servings: 6
Luby’s Fried Fish Recipe
This recipe is a classic “three-bowl dredge” situation: flour, buttermilk-egg dip, and crushed saltines.
It’s simple, but the texture comes out so good. The saltines fry up crisp and light, not heavy like breadcrumbs sometimes get.
The fish I use most often is cod because it’s mild, flaky, and holds together well when fried. But honestly, this method works with most white fish.
Fish Preparation
Fish prep is boring but important. If the fish is too wet, the coating won’t stick right, and the crust can slide off in the oil. So yeah… I don’t skip drying it.
Equipment
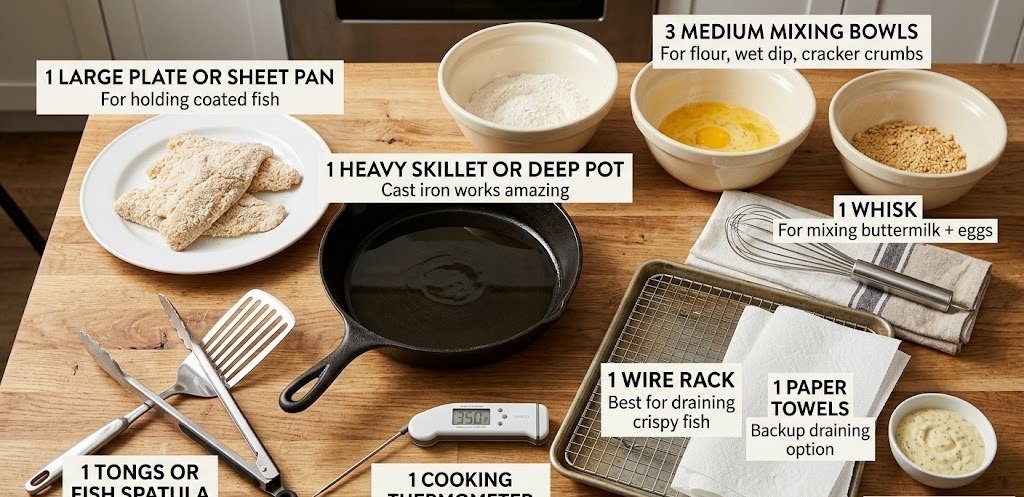
| Amount | Name | Notes |
|---|---|---|
| 3 | Medium mixing bowls | For flour, wet dip, cracker crumbs |
| 1 | Whisk | For mixing buttermilk + eggs |
| 1 | Large plate or sheet pan | For holding coated fish |
| 1 | Heavy skillet or deep pot | Cast iron works amazing |
| 1 | Cooking thermometer | Helps keep oil at 350°F |
| 1 | Tongs or fish spatula | For flipping safely |
| 1 | Wire rack | Best for draining crispy fish |
| 1 | Paper towels | Backup draining option |
| 1 | Small bowl | For tartar sauce |
Ingredients
| Amount | Unit | Name | Notes |
|---|---|---|---|
| 6 | pieces | Cod fillets | About 4–6 oz each |
| 1 | cup | All-purpose flour | Gluten-free flour also works |
| 2 1/3 | cups | Saltine crackers, finely crushed | The key crunchy coating |
| 1 | cup | Buttermilk | Full-fat is best |
| 3 | large | Eggs | Helps the coating stick |
| 1/2 | tsp | Salt | Add more after frying if needed |
| 1/4 | tsp | Black pepper | Simple seasoning |
| as needed | — | Vegetable oil | For frying, about 2 inches deep |
For the Tartar Sauce
| Amount | Unit | Name | Notes |
|---|---|---|---|
| 2 | cups | Mayonnaise | Real mayo tastes best here |
| 1/4 | cup | Yellow onion, finely minced | Very small dice |
| 1/4 | cup | Fresh parsley, minced | Stems removed |
| 1/2 | cup | Dill pickle relish | Drain it well |
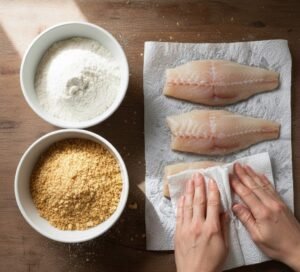
Step 1: Prepping the Fish
Rinse the cod fillets quickly under cold water, then pat them dry really well with paper towels.
I mean it—dry fish is the difference between a coating that sticks and a coating that slides right off.
If your fillets are thick, you can cut them into slightly smaller portions. Luby ’s-style fish is usually portion-sized, not huge restaurant fillets.
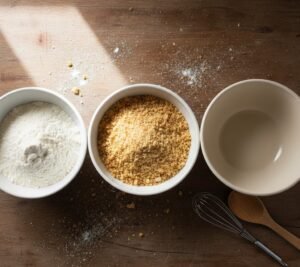
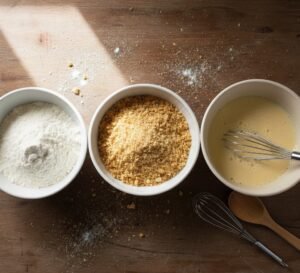
Step 2: Setting Up the Dredging Station
Set up three bowls:
In the first bowl, add the flour.
In the second bowl, whisk together the buttermilk, eggs, salt, and pepper until they look smooth and blended.
In the third bowl, add the finely crushed saltine crackers.
This setup makes the whole process easier and cleaner, and it also keeps your coating from getting clumpy too fast.
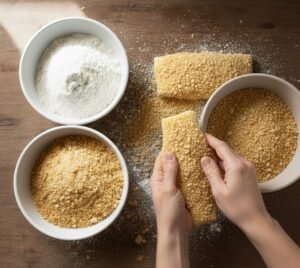
Step 3: Coating the Fish
Coat each piece of fish in the flour first. Shake off the excess.
Then dip it into the buttermilk mixture, letting the extra drip off.
Finally, press it firmly into the crushed crackers, making sure every spot is covered.
I always press the cracker crumbs in with my hands. Not aggressively, but enough that the coating feels “locked in.”
Kneading the Batter Into the Fish (Luby ’s-Style)
This part sounds dramatic, but it’s really just the technique that makes this recipe work.
Instead of using a thick batter, this method builds layers. The flour creates a dry surface, the buttermilk mixture acts like glue, and the crackers create the crunch.
The biggest mistake people make is lightly coating the fish like it’s no big deal. It is a big deal. If the cracker layer is loose, it can break off while frying, and then you’re stuck with bare fish.
So when you press the cracker crumbs on, take a second and make sure it feels secure. If the coating looks patchy, press on more crumbs.
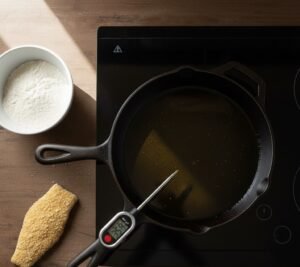
Frying the Fish
Frying fish can feel intimidating, but it’s honestly simple once you focus on one thing: oil temperature.
If the oil is too cool, your fish turns greasy and sad. If the oil is too hot, the crust burns before the inside cooks.
Oil Temperature and Frying Time
Heat about 2 inches of oil in a deep skillet or pot to 350°F.
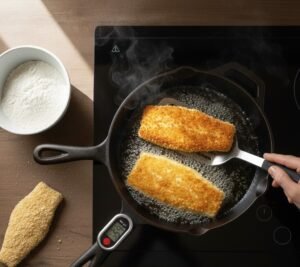
Once the oil is hot, gently add 1–2 pieces of fish at a time. Don’t crowd the pan. Crowding drops the oil temp fast and makes the coating soggy.
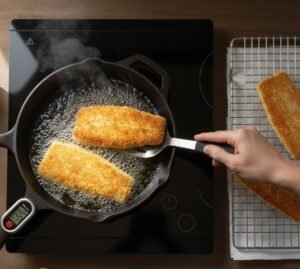
Fry the fish for about 3 to 4 minutes per side, depending on thickness.
The fish is done when:
- The coating is golden brown
- The fish flakes easily with a fork
- The internal temp is about 145°F
Remove the fish and place it on a wire rack to drain. A wire rack is the best way to keep it crisp, because the bottom won’t steam.
Making the Homemade Tartar Sauce
This tartar sauce is so classic, creamy, and simple. It tastes like the kind you get at cafeterias, not the overly fancy kind with capers and Dijon and all that.
It’s the perfect match for fried fish because it’s tangy, a little sweet, and cool.
Tartar Sauce Preparation
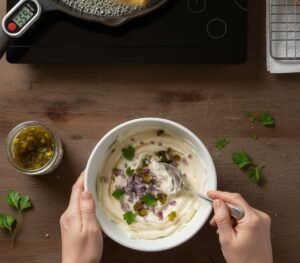
In a bowl, mix the minced onion, minced parsley, drained relish, and mayonnaise.
Stir it until everything is evenly combined.
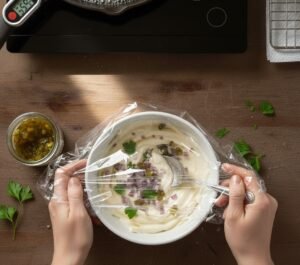
Cover and refrigerate for at least 1 hour before serving. It tastes way better after chilling because the onion and relish flavors blend into the mayo.
I usually make mine in the morning or even the night before if I’m planning a fish dinner.
Why This Method Works
Saltines are the secret. They fry up light and crispy, and they don’t feel heavy the way breadcrumbs can.
Also, the saltines already have salt built in, which helps the fish taste good even with minimal seasoning.
The buttermilk and egg combo is also important. Buttermilk adds a slight tang and helps tenderize the fish just a little. The eggs make sure the coating sticks and forms a strong crust.
And honestly, the simple seasoning is part of the charm. The fish flavor stays front and center, and the tartar sauce carries the boldness.
Serving and Presentation
Luby’s food is all about comfort. So I like serving this fish in that same spirit: simple, generous, and with sides that feel nostalgic.
A lemon wedge is always a good idea, too. Even if you don’t think you want it, a little squeeze over the crispy fish makes everything pop.
Suggested Sides
If I’m going full cafeteria mode, I usually serve it with:
- mashed potatoes and gravy
- coleslaw
- green beans
- mac and cheese
- steak fries
Even just one side plus tartar sauce makes this feel like a full meal.
Storage Instructions
Fried fish is best fresh, no question. But leftovers can still be good if you store and reheat it the right way.
Keeping Fried Fish Fresh
Let the fish cool completely before storing it. If you put hot fish into a container, it traps steam and softens the crust.
Store leftovers in an airtight container in the fridge for up to 2 days.
To reheat, place the fish on a wire rack over a baking sheet and bake at 375°F for about 10 minutes until hot and crisp again.
Microwaving works in a pinch, but yeah… it turns soft. I try not to do it unless I’m desperate.
Freezing Fried Fish
You can freeze it, but the texture won’t be the same as fresh.
Wrap each piece in parchment paper, then place it into a freezer bag.
Freeze for up to 1 month.
Reheat straight from frozen at 400°F until hot and crisp, usually 15–20 minutes depending on thickness.
Required Kitchen Tools
You don’t need anything fancy, but the thermometer really helps. If you don’t have one, you can still do it, but you’ll need to watch the oil carefully.
The tools that matter most are:
- mixing bowls
- a heavy pan or pot
- tongs or a fish spatula
- wire rack for draining
Luby’s Fried Fish Recipe
Ingredients
Equipment
Method
- Set up three bowls: one with flour, one with crushed saltine crackers, and one empty medium bowl for the wet mixture.
- In the medium bowl, whisk together buttermilk, eggs, salt, and pepper until smooth.
- Pat the cod fillets dry with paper towels so the coating sticks better.
- Coat each fish piece in flour, shaking off the excess.

- Dip the floured fish into the buttermilk mixture, letting extra drip off.

- Press the fish firmly into the crushed saltine crackers until evenly coated on all sides.
- Heat about 2 inches of oil in a skillet or pot to 350°F–365°F.
- Fry fish in small batches for about 3–4 minutes per side, until golden brown and cooked through.
- Remove fish and drain on a wire rack (best) or paper towels.
- To make the tartar sauce, mix mayonnaise, onion, parsley, and drained relish in a bowl.
- Cover and refrigerate tartar sauce for at least 1 hour before serving for the best flavor.
Video
Notes
- I always recommend drying the fish well before dredging, because it helps the coating stick and stay crispy.
- Don’t overcrowd the pan while frying, or the oil temp drops and the fish turns greasy.
- The tartar sauce tastes way better after chilling, so I usually make it ahead.
FAQs:-
What kind of fish is best for Luby’s fried fish?
Cod is the closest match, but haddock, pollock, or tilapia work too.
Why is my cracker coating falling off?
Your fish may be too wet, or you didn’t press the cracker crumbs on firmly enough.
What temperature should oil be for frying fish?
Keep the oil between 350°F and 365°F for the best crispy texture.
Can I make Luby’s tartar sauce ahead of time?
Yes! It tastes better after chilling for at least 1 hour.
How do I reheat fried fish so it stays crispy?
Reheat in the oven at 375°F for 10 minutes on a wire rack.
Nutritional Information
Nutrition will vary depending on oil absorption and portion size, but here’s the general estimated nutrition per serving (1 piece of fish + tartar sauce):
- Calories: ~650–780
- Protein: ~35–55g
- Carbohydrates: ~40–55g
- Fat: ~45–60g
- Saturated Fat: ~8–12g
- Sodium: ~900–1200mg
- Cholesterol: ~115–240mg
Conclusion
This Luby’s fried fish recipe is one of those comfort meals I always come back to. The cracker crust is crispy, the cod stays tender, and that tartar sauce honestly makes the whole plate. It’s simple, cozy, and tastes like a little cafeteria nostalgia right at home.
Read More:- Zaxby’s Wimpy Sauce Recipe