Lee’s Famous Recipe Chicken is one of those meals that instantly feels like comfort food, even before it hits the table.
It’s crispy on the outside, juicy in the middle, and packed with that cozy Southern-style flavor that makes everyone want “just one more piece.
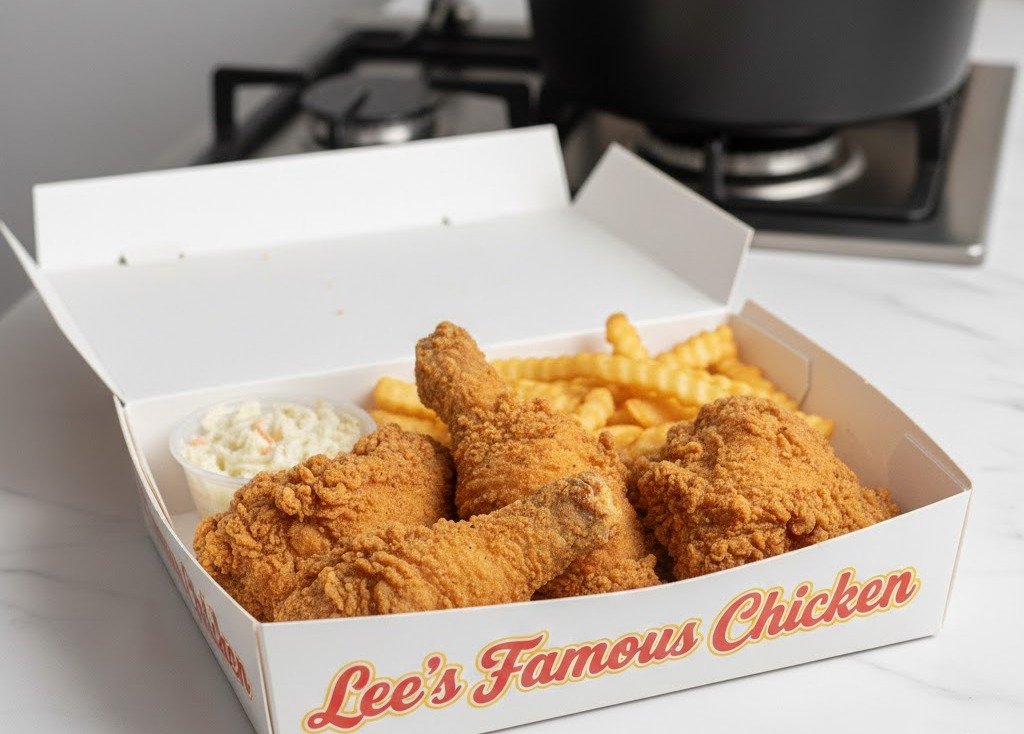
I love this recipe because it gives you that restaurant-style fried chicken at home, without making it complicated or stressful.
Hi, my name is Dipendra Kumar. I like cooking food for my family and relatives. My relative calls me a pro chef,
Before we get into the full recipe, here’s a quick recipe overview so you can plan it easily.
- Cuisine: Southern / American
- Prep Time: 20 minutes (plus marinating time)
- Cook Time: 25 minutes
- Servings: 6
This recipe is all about getting that golden crust that stays crunchy, while the chicken stays tender and juicy inside.
What makes it special is the seasoning blend and the simple buttermilk soak.
The buttermilk helps tenderize the chicken, while the coating builds a crispy, flavorful crust that tastes as if it came straight from a famous chicken shop.
I’ve made this recipe for weekend dinners, family gatherings, and even for game nights, and it always disappears fast.
It’s the kind of fried chicken people keep picking at while standing in the kitchen, even before you’ve sat down.
When I First Tried Lee’s Famous Chicken
The first time I tried a chicken recipe like this, I was honestly surprised by how much the buttermilk mattered.
I used to think fried chicken was mostly about the flour, but nope… the marinade is where the magic starts.
I remember tasting that first crunchy bite and thinking, “ok this is the real deal.” The crust was light but crisp, not thick and heavy.
And the chicken inside stayed juicy instead of drying out. After that, I started making my own version at home, tweaking the seasoning until it tasted exactly how I wanted it.
Now it’s one of those recipes I come back to again and again, because it always works.
Equipment
Fried chicken doesn’t require fancy tools, but having the right setup makes the process smoother and safer.
I always recommend using a thermometer, because keeping the oil at the right temperature is basically the secret to great fried chicken.
Equipment You Need
| Amount | Equipment Name | Notes |
|---|---|---|
| 1 | Large mixing bowl | For marinating chicken |
| 1 | Second large bowl | For flour mixture |
| 1 | Medium bowl | For egg wash |
| 1 | Deep pot or Dutch oven | For frying safely |
| 1 | Kitchen thermometer | Keeps oil steady at 350°F |
| 1 | Tongs | For flipping chicken |
| 1 | Wire rack | Best for draining and staying crispy |
| 1 | Baking sheet | Place rack on top |
| 1 | Paper towels | Backup draining option |
Ingredients
This ingredient list is simple, but the seasoning blend gives it that bold, classic fried chicken taste.
I like using a mix of paprika, garlic, onion powder, and herbs because it gives a rich flavor without being too spicy.
| Amount | Unit | Ingredient Name | Notes |
|---|---|---|---|
| 3 | lbs | chicken pieces | Drumsticks, thighs, wings, or breasts |
| 2 | cups | buttermilk | For marinating |
| 2 | large | eggs | For binding |
| 2 | cups | all-purpose flour | Base coating |
| 2 | tbsp | paprika | Adds color + flavor |
| 1 | tbsp | garlic powder | Classic fried chicken flavor |
| 1 | tbsp | onion powder | Adds depth |
| 1 | tsp | oregano | Dried |
| 1 | tsp | basil | Dried |
| 2 | tsp | black pepper | Fresh ground is best |
| 1 | tsp | cayenne pepper | Optional, for heat |
| 2 | tbsp | salt | Adjust to taste |
| 6 | cups | frying oil | Vegetable or peanut oil |
Step-by-Step Instructions
This recipe works best when you take your time with the coating. Don’t rush that part, because it’s what gives you that signature crunch.
Step 1: Prep the Chicken
Rinse the chicken pieces lightly under cold water, then pat them very dry with paper towels.
I know some people skip rinsing, and that’s totally fine too, but drying is non-negotiable. If the chicken is too wet, the coating gets weird and slippery.
Place the chicken into a large mixing bowl.
Step 2: Marinate the Chicken
Pour the buttermilk into the bowl with the chicken. Crack in the eggs and whisk them right into the buttermilk mixture.
Make sure all chicken pieces are fully coated, then cover and refrigerate for at least 1 hour. If you can leave it for 4 hours, it’s even better. The chicken turns out more tender and flavorful.
Step 3: Mix the Breading
In a second large bowl, combine the flour, paprika, garlic powder, onion powder, oregano, basil, black pepper, cayenne pepper (if using), and salt.
Stir it really well so the spices are evenly mixed throughout. You don’t want one piece of chicken getting all the salt while another piece gets none, trust me.
Step 4: Heat the Oil
Pour your oil into a deep pot or Dutch oven. You want enough oil so the chicken can fry properly, usually around 2 inches deep.
Heat the oil to 350°F. This is the sweet spot. Too low and the chicken gets greasy. Too high and it burns before the inside cooks.
Step 5: Coat the Chicken
Take one piece of chicken at a time from the buttermilk mixture and let the excess drip off.
Place it into the flour mixture and press the coating onto the chicken. Don’t just roll it lightly. Press it in so you get that thick, craggy crust.
Repeat with all pieces, placing them on a tray or plate once coated.
Step 6: Rest the Coated Chicken
Let the coated chicken sit for about 10 minutes before frying. This step sounds small, but it helps the coating stick better when it hits the oil.
If you skip this, sometimes the crust falls off, and that’s just sad.
Step 7: Fry the Chicken
Carefully place chicken pieces into the hot oil, working in batches. Do not overcrowd the pot, because it drops the oil temperature fast.
Fry each piece for about 10–12 minutes, flipping once halfway through. Smaller pieces like wings cook faster, while thick thighs may take slightly longer.
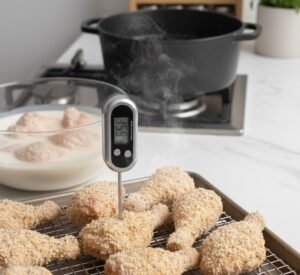
Step 8: Check Doneness
Use a meat thermometer and check the thickest part of the chicken. It must reach 165°F inside.
If it’s not there yet, keep frying for another 2–3 minutes and check again.
Step 9: Drain the Chicken
Remove the fried chicken and place it on a wire rack over a baking sheet. This keeps the chicken crispy while it cools slightly.
If you place it directly on paper towels, it can steam and soften, but paper towels still work in a pinch.
Step 10: Serve Hot
Serve the chicken while it’s hot and crispy. This is when it tastes the best, and honestly, it’s hard to wait even 2 minutes.
Pro Cooking Tips for Success
The biggest secret to fried chicken is temperature control. If your oil drops below 325°F, the chicken starts soaking up oil and gets heavy.
I also recommend seasoning the flour mixture boldly. Fried chicken needs more seasoning than you think, because some of it stays in the coating bowl.
And one more thing, don’t overcrowd the pot. I know it’s tempting to fry everything at once, but it ruins the crust.
Serving Suggestions
Lee’s Famous Recipe Chicken is amazing with classic comfort food sides. I personally love it with creamy mashed potatoes because the crispy chicken + smooth potatoes is just perfect.
It also pairs really well with coleslaw, baked mac and cheese, cornbread, biscuits, or even just fries.
If you want something lighter, roasted vegetables or a fresh salad work too.
For parties, I like serving it on a big platter with different dipping sauces on the side. People love choices.
Storage & Make-Ahead Tips
If you have leftovers, store the chicken in an airtight container in the fridge for up to 3–4 days.
To reheat and keep it crispy, bake it in the oven at 350°F for 10–15 minutes. You can also use an air fryer for about 6–8 minutes.
Freezing is possible too. Wrap each piece tightly and freeze for up to 3 months. Thaw overnight in the fridge before reheating.
Delicious Variations
If you want to switch things up, there are a few ways to do it without losing that classic vibe.
You can add a little smoked paprika for a deeper flavor, or mix in a teaspoon of chili powder for a bolder kick.
For extra crunch, replace ½ cup of flour with cornstarch in the breading mixture. It makes the crust lighter and crispier.
You can also use boneless chicken tenders for a quicker version, which is great for kids.
Substitutes for Common Ingredients
If you don’t have buttermilk, you can make a quick substitute by mixing 2 cups of milk with 2 tablespoons of lemon juice or vinegar. Let it sit for 5 minutes, and it’s ready.
If you don’t want cayenne, you can skip it completely. The chicken still has plenty of flavor.
For oil, vegetable oil works great, but peanut oil gives a slightly cleaner fry and a more classic restaurant taste.
Healthier Options
This is fried chicken, so it’s definitely a comfort meal, not a salad moment. But you can make it lighter.
You can air fry the coated chicken at 375°F for about 25–30 minutes, flipping halfway. It won’t be identical to deep frying, but it still turns out crispy and delicious.
You can also bake it at 400°F for 35–40 minutes on a wire rack, spraying the chicken lightly with oil so it browns nicely.
Nutritional Information
Nutrition will vary depending on the chicken pieces you use and how much oil is absorbed during frying. These are rough estimates per serving (based on 6 servings).
- Calories: 380–480 kcal
- Protein: 28–35 g
- Fat: 22–30 g
- Carbohydrates: 18–25 g
- Sodium: 650–900 mg
- Fiber: 1–2 g

Lee’s Famous Chicken Recipe
Ingredients
Equipment
Method
- Pour the buttermilk into a large bowl and add the chicken pieces. Toss until coated, cover, and refrigerate for at least 1 hour.

- In a medium bowl, whisk together the flour, cornstarch, salt, black pepper, garlic powder, onion powder, paprika, and cayenne pepper.

- In a small bowl, whisk the eggs and water together until smooth.

- Remove the chicken from the buttermilk and let the excess drip off. Dip each piece into the egg wash, then press into the seasoned flour mixture until fully coated.

- Let the coated chicken rest on a tray for about 10 minutes. This helps the coating stick better while frying.

- Heat oil in a deep skillet or Dutch oven to 350°F. Keep the temperature steady for the crispiest results.

- Fry the chicken in small batches for about 10–12 minutes, turning once halfway through, until golden brown and cooked through.

- Check the internal temperature using a meat thermometer. Chicken should reach 165°F in the thickest part.
- Transfer the chicken to a wire rack and let it drain for a few minutes before serving.

Notes
- I always recommend frying in small batches so the oil temperature doesn’t drop.
- If your coating starts browning too fast, your oil is too hot — lower it slightly.
- For extra crunch, I sometimes double dip: flour → egg → flour again.
- Reheat leftovers in the oven at 350°F for 10–15 minutes to keep it crispy.
Lee’s Famous Recipe Chicken is one of those meals that instantly feels like comfort food, even before it hits the table.#recipes #chickenrecipe pic.twitter.com/JauwSwLalP
— Heaven Bite Recipes (@BiteHeaven34559) March 12, 2026
FAQs:-
What is Lee’s Famous Recipe Chicken known for?
It’s known for its crispy seasoned coating and juicy chicken inside, made with a signature-style spice blend.
Can I make Lee’s Famous Recipe Chicken without buttermilk?
Yes, you can use regular milk mixed with 1 tablespoon of vinegar or lemon juice as a quick substitute.
What oil is best for frying Lee’s Famous Recipe Chicken?
Vegetable oil or peanut oil works best because they handle high heat and keep the coating crispy.
How do I keep fried chicken crispy after cooking?
Place it on a wire rack instead of paper towels, and avoid covering it while it’s still hot.
How long should I fry chicken pieces at 350°F?
Most pieces take about 10–12 minutes, but always confirm doneness with a thermometer (165°F inside).
Conclusion
Lee’s Famous Recipe Chicken is one of my favorite comfort meals because it’s crispy, juicy, and packed with real homemade flavor. I love how the buttermilk keeps the chicken tender while the seasoned coating turns golden and crunchy. When I make it at home, it feels like a restaurant treat, but cheaper and better.
Read More:- French Meat Stuffing Recipe