There are some restaurant appetizers that people remember more than the main meal, and for me, this blooming onion is one of them.
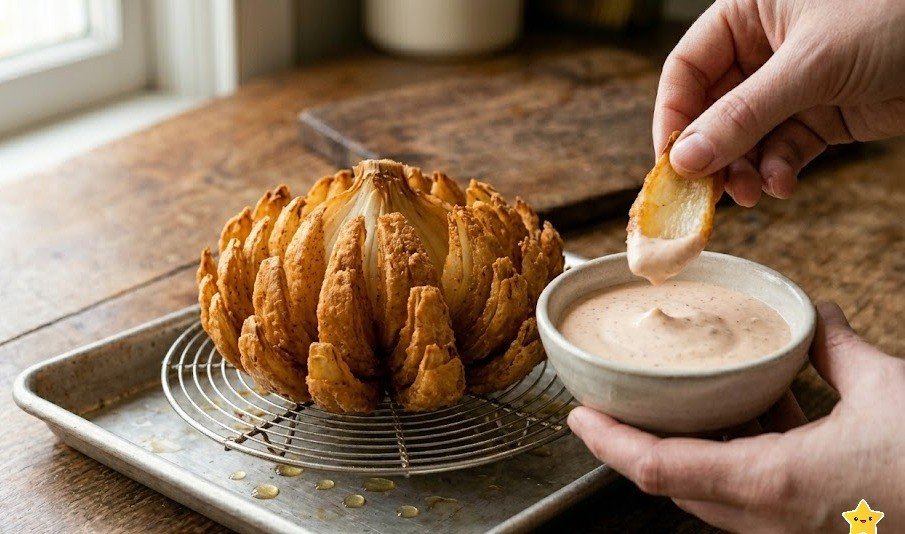
The first time I ordered one at Texas Roadhouse, I honestly thought it was just a fancy onion ring. Then I pulled apart a crispy petal, dipped it into the creamy sauce, and understood why so many people order it on every visit.
I started making this Texas Roadhouse Blooming Onion Recipe at home because paying restaurant prices every time wasn’t practical.
After several attempts, a few kitchen messes, and one onion that completely fell apart in hot oil, I finally found a method that works consistently.
What I love most is that it looks impressive but uses simple pantry ingredients. The crispy coating, tender onion center, and zesty dipping sauce create the perfect combination of texture and flavor.
What is a Texas Roadhouse Blooming Onion?
A blooming onion is a large sweet onion cut into petals that open up like a flower during cooking. Each petal is coated with seasoned flour and fried until golden brown.
While many people associate the dish with Outback Steakhouse, the version served at Texas Roadhouse has developed its own loyal following.
The restaurant actually calls it the Cactus Blossom, but the cooking method remains very similar. The onion becomes crispy on the outside while staying soft and sweet inside.
What Makes It Special?
After testing several versions, I noticed the biggest difference comes from the seasoning blend and dipping sauce.
The coating has a slightly stronger savory flavor compared to many restaurant versions. The combination of paprika, garlic powder, black pepper, and cayenne creates layers of flavor without becoming overwhelming.
Another thing that stands out is the texture. When prepared correctly, every petal develops a crunchy crust that stays crisp for several minutes after frying. That’s not always easy to achieve at home.
Ingredients
Onion Ingredients
| Ingredient | Amount |
|---|---|
| Large sweet onion | 1 |
| All-purpose flour | 1½ cups |
| Paprika | 1½ tsp |
| Garlic powder | 1 tsp |
| Salt | 1 tsp |
| Black pepper | ½ tsp |
| Cayenne pepper | ¼ tsp |
| Buttermilk | 1 cup |
| Large egg | 1 |
| Vegetable oil | For frying |
Dipping Sauce Ingredients
| Ingredient | Amount |
|---|---|
| Mayonnaise | ½ cup |
| Ketchup | 1 tbsp |
| Horseradish sauce | 1 tsp |
| Paprika | 1 tsp |
| Garlic powder | ½ tsp |
| Cayenne pepper | ¼ tsp |
| Salt | Pinch |
Ingredient Notes and Substitutions
I always recommend using sweet onions, such as Vidalia onions, because they have more natural sugars and less sharpness than standard onions.
If buttermilk isn’t available, mix one cup of regular milk with one tablespoon of lemon juice or vinegar and let it sit for about 5 minutes.
For a gluten-free version, substitute a quality 1:1 gluten-free flour blend. The texture changes slightly, but it still works surprisingly well.
Equipment Needed
| Equipment | Purpose |
|---|---|
| Sharp knife | Cutting onion petals |
| Cutting board | Safe preparation |
| Large mixing bowls | Batter and coating |
| Deep pot or fryer | Frying |
| Cooking thermometer | Monitor oil temperature |
| Slotted spoon | Removing onion safely |
| Paper towels | Draining excess oil |
| Whisk | Mixing sauce |
Preparation and Cooking Time
| Task | Time |
|---|---|
| Preparation | 15 minutes |
| Chilling | 10 minutes |
| Cooking | 10 minutes |
| Total Time | 35 minutes |
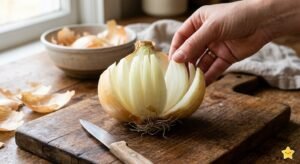
How to Cut a Blooming Onion
This is the step that scares most people, but its actually easier than it looks.
Start by removing the top of the onion while keeping the root intact. The root acts like a natural anchor that holds all the petals together during frying.
Place the onion root-side down. Starting about half an inch from the root, make four equally spaced cuts. Then continue slicing between each section until you create around 12 to 16 petals.
Carefully spread the petals outward using your fingers. Don’t force them too much or they may break.
How to Make a Texas Roadhouse Blooming Onion Recipe
Step 1: Prepare the Onion
Peel the onion and cut it into blooming petals while keeping the root attached. Gently separate the layers.
Step 2: Create the Seasoned Flour Mixture
In a large bowl, combine flour, paprika, garlic powder, salt, black pepper, and cayenne pepper. Mix everything evenly.
Step 3: Prepare the Wet Mixture
In another bowl, whisk together the buttermilk and egg until smooth.
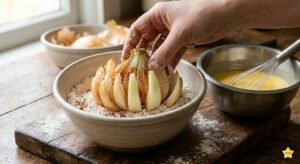
Step 4: Coat the Onion
Dip the onion into the buttermilk mixture. Make sure the liquid reaches every petal.
Transfer the onion to the flour mixture and coat thoroughly. Press flour gently between the petals.
For extra crunch, repeat the process one more time.
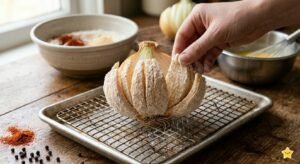
Step 5: Chill the Onion
Place the coated onion in the refrigerator for 10 minutes.
I learned this trick after several failed attempts. Chilling helps the coating stay attached during frying.
Step 6: Heat the Oil
Heat vegetable oil to 375°F (190°C).
Maintaining the correct oil temperature is critical. According to food science studies, frying temperatures between 350°F and 375°F produce optimal moisture retention while minimizing excessive oil absorption.
Step 7: Fry the Onion
Carefully lower the onion into the hot oil.
Fry for about 8 to 10 minutes until golden brown and crispy. Turn once if necessary.
Step 8: Drain and Rest
Remove the onion and place it on paper towels.
Allow it to rest for two minutes before serving.
Texas Roadhouse Blooming Onion Dipping Sauce
The sauce is honestly half the reason I make this recipe.
Whisk together mayonnaise, ketchup, horseradish sauce, paprika, garlic powder, cayenne pepper, and a pinch of salt.
Refrigerate for at least 15 minutes before serving.
The horseradish creates a gentle kick that balances the richness of the fried onion. Without it, the sauce feels incomplete.
Tips for the Perfect Blooming Onion
I learned these lessons through trial and error.
- Use a large sweet onion whenever possible.
- Keep oil temperature close to 375°F.
- Double-coat the onion for maximum crunch.
- Chill before frying.
- Fry one onion at a time.
- Make the sauce ahead for better flavor development.
- Use fresh spices rather than old pantry spices.
Common Mistakes to Avoid
Cutting Too Close to the Root
If you cut through the root, the onion can fall apart in the oil.
Oil Temperature Too Low
Low temperatures cause excessive oil absorption and soggy petals.
Skipping the Rest Period
Allowing the coating to set before frying improves adhesion significantly.
Overcrowding the Fryer
Cooking multiple onions together reduces oil temperature and affects crispiness.
Air Fryer Texas Roadhouse Blooming Onion
I tested an air fryer version several times.
After coating the onion, spray generously with cooking oil. Cook at 400°F for approximately 10 to 12 minutes.
The texture isn’t the same as deep-frying, but it still creates a crispy exterior with much less oil.
What to Serve with Texas Roadhouse Blooming Onion
This appetizer pairs beautifully with:
- Grilled steak
- Burgers
- Barbecue ribs
- Smoked brisket
- Fried chicken
- Pulled pork sandwiches
- Garden salad
During football season, I often serve it alongside wings and sliders for game-day gatherings.
Storage Instructions
Store leftovers in an airtight container inside the refrigerator for up to two days.
I don’t recommend freezing because the crispy coating tends to lose texture after thawing.
How to Reheat Leftover Blooming Onion
Avoid using a microwave whenever possible.
Instead:
- Oven: 350°F for 5 to 7 minutes
- Air Fryer: 375°F for 4 to 5 minutes
These methods restore much of the original crispiness.
Nutrition Information
Approximate nutrition per serving:
- Calories: 450-550
- Protein: 7g
- Total Fat: 28g
- Saturated Fat: 5g
- Carbohydrates: 55g
- Fiber: 4g
- Sugar: 6g
- Sodium: 850mg
Actual values may vary depending on oil absorption and portion size.

Texas Roadhouse Blooming Onion Recipe
Ingredients
Equipment
Method
- Peel the onion and cut it into blooming petals while keeping the root attached. Gently separate the layers.
- In a large bowl, combine flour, paprika, garlic powder, salt, black pepper, and cayenne pepper. Mix everything evenly..

- Inanother bowl, whisk together the buttermilk and egg until smooth.
- Dip the onion into the buttermilk mixture. Make sure the liquid reaches every petal. Transfer the onion to the flour mixture and coat thoroughly. Press flour gently between the petals.For extra crunch, repeat the process one more time.
- Place the coated onion in the refrigerator for 10 minutes.I learned this trick after several failed attempts. Chilling helps the coating stay attached during frying.

- Heat vegetable oil to 375°F (190°C).Maintaining the correct oil temperature is critical. According to food science studies, frying temperatures between 350°F and 375°F produce optimal moisture retention while minimizing excessive oil absorption.

- Carefully lower the onion into the hot oil. Fry for about 8 to 10 minutes until golden brown and crispy. Turn once if necessary.

- Remove the onion and place it on paper towels. Allow it to rest for two minutes before serving.

Notes
- Use a large sweet onion for the best blooming effect.
- Keep oil temperature at 375°F for maximum crispiness.
- Double-coating helps create a thicker restaurant-style crust.
- The dipping sauce tastes even better after chilling for 15–20 minutes.
- Leftovers can be reheated in an air fryer at 375°F for 4–5 minutes to restore crunch.
FAQs:-
What is the best onion for a blooming onion?
A large sweet onion like Vidalia is the best choice because it has a mild flavor and opens into large petals when fried.
Can I make a blooming onion in an air fryer?
Yes. Spray the coated onion with oil and air fry at 400°F for 10–12 minutes until crispy and golden.
Why is my blooming onion soggy?
The oil temperature was likely too low. Keep the oil around 375°F for the crispiest results.
What dipping sauce goes with a blooming onion?
A creamy sauce made with mayonnaise, ketchup, horseradish, paprika, and garlic powder is the classic choice.
How do I store leftover blooming onion?
Store leftovers in an airtight container in the refrigerator for up to 2 days and reheat in the oven or air fryer.
Conclusion:-
This Texas Roadhouse Blooming Onion Recipe has become one of my favorite appetizers to make at home. It looks impressive, tastes amazing, and always gets people talking when I bring it to the table.
The first time you make it, it may not look exactly like the restaurant version, and thats completely normal. Mine certainly didn’t. But once you get comfortable cutting the onion and controlling the oil temperature, the process becomes much easier.
Whether you’re serving it for game day, family dinner, or simply because you’re craving something crispy and indulgent, this homemade blooming onion delivers restaurant-style flavor without leaving your kitchen.