Welcome, today I’m sharing my full guide to making a Perry ’s-style pork chop recipe at home, the kind that feels dramatic, juicy, smoky, buttery, and honestly a little luxurious without needing a steakhouse reservation.

The first time I tasted this famous chop, I remember thinking how something so simple could taste so rich and perfectly balanced.
Hi, my name is Dipendra Kumar. I like cooking food for my family and relatives. My relative call me a pro chef.
After many trials in my kitchen, I finally created a method that captures the same experience using practical home-cook techniques.
This article covers everything — from choosing the right pork, brining, seasoning, slow cooking, caramelizing, and finishing touches — so you can recreate that iconic thick-cut pork chop confidently.
Recipe Overview
Cuisine: American Steakhouse
Prep Time: 30 minutes (plus brining time)
Cook Time: 1 hour
Servings: 4
Difficulty: Intermediate but totally manageable
What Makes Perry’s Pork Chop So Special
What separates this pork chop from an ordinary one is not just size it’s technique. The chop is thick, carefully seasoned, slow-cooked, then finished with caramelization and butter.
Every stage builds flavor instead of rushing the process.
The result is pork that stays incredibly juicy while developing a slightly sweet crust and deep smoky flavor.
Each bite tastes intentional, not heavy or overly sauced. That balance is what makes this dish unforgettable.
Differences Between Restaurant Style and Home Version
The real steakhouse version is cured, smoked, roasted, caramelized, and carved tableside. At home, we simplify without losing flavor.
Instead of professional curing, I use a brine. Rather than commercial smokers, a low oven or grill works beautifully.
The goal is not a replica but achieving similar texture, tenderness, and flavor depth using realistic equipment.
Equipment Needed
| Amount | Equipment | Notes |
|---|---|---|
| 1 | Cast iron skillet | Best for searing and oven finishing |
| 1 | Meat thermometer | Essential for perfect doneness |
| 1 | Mixing bowl | For brine and seasoning |
| 1 | Baking dish | Backup if skillet isn’t oven-safe |
| 1 | Tongs | Safe handling while searing |
| 1 | Small saucepan | For butter finishing |
| 1 | Aluminum foil | Resting the meat |
Ingredients
Pork & Brine
| Amount | Ingredient | Notes |
|---|---|---|
| 2–4 | Bone-in pork chops | 2–3 inches thick |
| 4 cups | Water | For brining |
| ¼ cup | Kosher salt | Moisture retention |
| 2 tbsp | Brown sugar | Flavor balance |
| 3 cloves | Garlic | Light aroma |
| 1 tsp | Peppercorns | Optional |
Seasoning & Cooking
| Amount | Ingredient | Notes |
|---|---|---|
| 2 tbsp | Olive oil | For searing |
| 2 tbsp | Unsalted butter | Finishing richness |
| 1 tsp | Smoked paprika | Smoky depth |
| 1 tsp | Garlic powder | Savory flavor |
| 1 tsp | Onion powder | Balance |
| ½ tsp | Black pepper | Freshly ground |
| ½ tsp | Cayenne pepper | Optional heat |
| 1 tsp | Fresh thyme or rosemary | Aromatic finish |
| 2 tsp | White sugar | Caramelized crust |
| 1 tsp | Minced garlic | Butter finish |
Picking the Best Pork Chop
This recipe depends heavily on thickness. Thin pork chops cook too fast and dry out easily.
I always choose bone-in chops at least two inches thick because they retain moisture better and allow slow cooking without overcooking.
Look for visible marbling. Fat equals flavor and tenderness. Even standard grocery pork works beautifully if it has some internal fat.
Why Brining Is Important
Brining might feel like an extra step, but it changes everything. Pork loin meat is lean and easily dries out during cooking.
A saltwater solution allows the meat to absorb moisture before heat is applied.
The result is pork that stays juicy even after searing and roasting. I noticed the biggest improvement in my cooking once I started brining consistently.
Step-by-Step Cooking Instructions
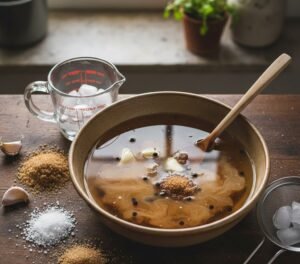
Step 1: Prepare the Brine
In a mixing bowl, dissolve kosher salt and brown sugar in warm water. Add garlic and peppercorns.
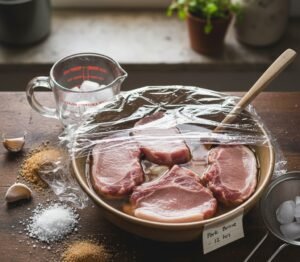
Let the mixture cool completely before adding pork chops. Submerge the chops fully and refrigerate for at least 6–12 hours.
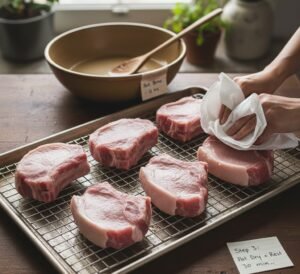
Step 2: Dry and Rest the Pork
Remove the pork from the brine and rinse lightly. Pat completely dry using paper towels.
Surface dryness is important because moisture prevents proper browning. Let the chops sit at room temperature for about 30 minutes.
Step 3: Season the Pork Chops
Mix paprika, garlic powder, onion powder, black pepper, and cayenne. Rub generously over all sides of the pork. Press the seasoning gently so it adheres well.
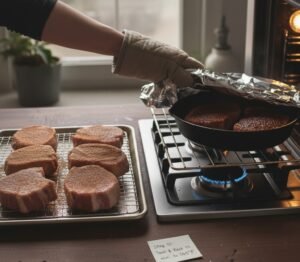
Step 4: Preheat and Prepare the Pan
Heat a cast-iron skillet over medium-high heat. Add olive oil and allow it to shimmer. A properly heated pan ensures a good crust.
Step 5: Sear for Flavor
Place pork chops carefully into the skillet. Sear about 3 minutes per side until golden brown. This step builds deep flavor rather than cooking the meat completely.
Step 6: Add Butter and Herbs
Lower the heat slightly and add butter, minced garlic, and fresh herbs. Spoon melted butter over the chops briefly to coat them with flavor.
Step 7: Slow Roast
Transfer the skillet to a preheated 300°F oven. Roast slowly until the internal temperature reaches about 140°F. Cooking slowly keeps the pork tender and evenly cooked.
Step 8: Caramelize the Exterior
Remove skillet from oven and sprinkle a thin layer of white sugar over the top of each chop.
Place under the broiler for 1–2 minutes until caramelized. Watch carefully because sugar burns quickly.
Step 9: Rest the Pork
Remove chops and loosely tent with foil. Rest for 10 minutes. During this time, internal temperature rises to the safe finishing temperature of 145°F while juices redistribute.
Step 10: Finishing Touches
Spoon garlicky butter from the pan over the pork before serving. Slice into sections or serve whole for a dramatic presentation.
The Perfect Pork Chop Technique
A perfect chop comes from temperature control rather than cooking time. Using a thermometer prevents guessing and eliminates overcooking.
Pulling the pork slightly early and allowing carryover cooking ensures juicy results every time.
Secrets to Success
Patience is the biggest secret. Thick pork needs gentle heat and resting time. High heat throughout cooking causes moisture loss.
Another key lesson I learned is that seasoning generously matters thick meat needs bold flavor to reach the center.
Serving Suggestions
This pork chop pairs beautifully with comforting steakhouse sides. I personally love serving it with creamy mashed potatoes, roasted vegetables, or buttered greens.
Something fresh alongside balances the richness and makes the meal feel complete.
Storage Instructions
Store leftovers in an airtight container in the refrigerator for up to three days. Reheat gently in a low oven covered with foil to prevent drying. Avoid microwaving at high heat because it tightens the meat fibers.
The pork also tastes surprisingly good sliced cold over salads or sandwiches the next day.
Creative Variations
You can customize the flavor depending on mood or occasion. Adding honey during the final roasting stage creates a sweeter glaze.
Chipotle powder adds smokiness, while a breadcrumb herb crust gives texture. Even grilling instead of oven roasting works well for a stronger smoky profile.
Nutrition Benefits
- High-quality protein supports muscle repair
- Rich in B vitamins for energy production
- Contains iron and zinc for immune health
- Naturally gluten-free meal option
- Provides satisfying fats that help with fullness
- Balanced protein-to-fat ratio for hearty meals
Personal Tips From My Kitchen
I learned that rushing this recipe always leads to disappointment. The first few times,
I skipped resting because I was hungry, and the juices ran everywhere instead of staying inside the meat. Now I always wait, even if it feels long.
Another small habit that helps me is mixing extra seasoning ahead of time. It turns this impressive dinner into something surprisingly easy on busy evenings.
And honestly, thicker pork chops are more forgiving than thin ones; they give you time to cook calmly.

Perry’s Pork Chop Recipe
Ingredients
Equipment
Method
- In a bowl, dissolve kosher salt and brown sugar in warm water. Add garlic and peppercorns, then cool completely.
- Submerge pork chops in the brine and refrigerate for 6–12 hours.
- Remove pork from brine, rinse lightly, and pat completely dry. Let sit at room temperature for 30 minutes.
- Mix paprika, garlic powder, onion powder, black pepper, and cayenne. Rub generously over all sides of the pork chops.

- Heat a cast iron skillet over medium-high heat and add olive oil.

- Sear pork chops for about 3 minutes per side until a golden crust forms.

- Add butter, minced garlic, and herbs. Spoon melted butter over the pork briefly.

- Transfer skillet to a preheated 300°F oven and roast until internal temperature reaches 140°F.

- Caramelizing & Finishing
- Sprinkle white sugar lightly over the pork chops and place under the broiler for 1–2 minutes until caramelized.

- Remove from oven, tent loosely with foil, and rest for 10 minutes until temperature reaches 145°F.
- Spoon garlic butter from the pan over the pork and serve immediately.

Notes
- Always use a meat thermometer for best results.
- Thick pork chops stay juicier and are harder to overcook.
- Resting the meat is essential to keep juices inside.
- Watch carefully during caramelizing since sugar burns quickly.
- Leftovers reheat best in a low oven covered with foil.
FAQs:-
What makes Perry’s pork chop different from regular pork chops?
It’s much thicker, slow-cooked, and finished with caramelization and butter, which makes it extra juicy, tender, and flavorful compared to standard pork chops.
What internal temperature should pork chops reach?
Pork chops are perfectly cooked at 145°F (63°C) internal temperature, followed by a short resting time.
Do I really need to brine pork chops?
Brining isn’t mandatory, but it helps keep the pork moist, tender, and well-seasoned throughout the meat.
Can I make this recipe without a cast-iron skillet?
Yes, you can sear the pork chops in any heavy pan, then transfer them to a baking dish to finish in the oven.
Why should pork chops rest after cooking?
Resting allows juices to redistribute inside the meat, keeping the pork juicy instead of dry when sliced.
Conclusion:-
Making a Perry’s-style pork chop at home feels special every single time I cook it. It turns a normal dinner into something memorable without complicated techniques. With patience, proper seasoning, and temperature control, you get tender, juicy pork with that signature caramelized finish. Once you try it, it easily becomes a repeat favorite in the kitchen.
Read More:- CAVA Fiery Broccoli Recipe